Additional Publishing Module

So, I finally got the time to publish my new module at Sitecore Marketplace. However, it is more like a couple of new Sitecore Client features than a real module. Actually, it’s only two new (but looong missing) features.

The module is called "Additional Publishing" and adds a new chunk into the “Publishing” tab, named “Additional Publishing”. The chunk contains the two new features/commands “Publish My Items” and “Publish Deleted Items”, respectively.


Publish My Items

The “Publish My Items” command allows a user (who has access right to the Publishing Tab) to publish all the items, the user has created and/or modified since the last time, the items was published. If the current user is an administrator, the administrator can choose another Sitecore user items to publish. 

The way the command work is, it takes all the publishing candidates from the Sitecore Publishing Queue and compare the value of the “__Updated by” field of the publishing candidate with the name of the current Sitecore user. If the “__Updated by” value is equal to the name of the current Sitecore user, the command will publish the item. 


Publish Deleted Items

The “Publish Deleted Items” command allows a user to “un-publish” or “remove” items from the publishing target databases, which have been deleted from the source/master database. This, without the need of publishing the parent item of a deleted item or without starting an incremental publishing of the website. 


The way the command works is, it (like the “Publish My Items” command) takes all the items located in the Publishing Queue and check whether the item exist in the source database (normally the master database). If the item does not exist in the source database (the item is deleted), the changes of the item (the deletion) will be published and the item will be removed the item from the publishing targets.

Content Editor Applications

In one of my last post, I wrote about how to change the source parameter of the Content Editor ending up with Content Editors displaying content from E.g. the Web database.

Another way to have a Content Editor handling different sources is to add additional Content Editor Applications to the existing Content Editor. A Content Editor Application is a link to an application rendered by the Content Editor. You navigate to the application by a link at the bottom of the Content Editor. By default, the Content Editor applications include the “Content Editor”, “Media Library” and the “Workbox”:


Adding a new Content Editor Application 

Adding a new Content Editor Application only takes a single step. 

Go to the Core database and navigate to “/Sitecore/content/applications/content editor/applications/”. Under this item, you find the Content Editor Applications of the “Content Editor”, “Media Library” and the “Workbox” respectively.

Create a new Content Editor Application item based on the template located at “/Sitecore/templates/Sitecore client/content editor/content editor application” or duplicate one of the existing Applications. In this case, I duplicated the “ContentEditorFrom” and renamed it to “Web DB” (I want a Content Editor displaying the items published to the Web database).


The Content Editor Application Item have two fields. The “Header” field providing the link text of the Content Editor Application, and the “Source” field referrer to the url of the webform to be rendered. Add “&sc_content=web” as a query string to the url, and the Content Editor uses the Web database. Changing it to “&sc_conten=core” and the Content Editor uses the Core database instead:


Save the added Content Editor Application item and reload the Content Editor from the Master database and your new created Content Editor Application will be displayed at the bottom of the Content Editor: 


Taking it a step further

From the Source field of the Content Editor Application, you can specify the destination path from where the navigation in the Content Editor (or Media Library) should start. You could duplicate the MediaLibraryForm and add the url to a specific folder in the Media Library into the “&ro=” query string etc.:


The new Content Editor Application will open up the Media Library with the “/Sitecore/media liabrary/images” as root item:


You can actually set the “&ro=” to any path in the database specified by the “&sc_content=” query string. In this way, you can specify the “&ro=” to point where Eg. The Sitecore module “Web Forms For Marketers” places the forms or where any module creates module specific items.

Because a new Content Editor Application is added as a new items into the Core database, you could use the Sitecore security settings to handle, who is able to see and use the Content Editor Applications.


EDIT: Or you could check this out - Content Editor Applications revisit

FillDB.aspx

In version 7 Sitecore introduced the FillDB.aspx, which allows you to create a huge amount of content items (for performance testing) based on several parameters specified in the FillDB.aspx.

In Sitecore version 7.2 the FillDB.aspx has been reworked. Besides that FillDB.aspx now uses a web.config setting to enabled the tool (which gives you the advantages of managing the tool differently from different environments), each step in the tool is now optional and lets the user specify the parameters for the steps. Also, from version 7.2 the FillDB.aspx handles POST request.

Following is a walkthrough of the FillDB.aspx from Sitecore version 7.2. You find the tool by navigate to /sitecore/admin/FillDB.aspx. By default, the tool is disabled due to the config setting "EnableFillDB":


The config setting for enabling the tool is located in the Sitecore.Bucket.config (located at “App_Config/Include”). You can change the value of the setting named “EnableFillDB” from “false” to “true” directly into this include file, or you can add the setting into a specific include file for the development environment (doing so, just make sure, your own include file will be rendered after the Sitecore.Bucket.config):

<configuration xmlns:patch="http://www.sitecore.net/xmlconfig/">
  <sitecore>
    <settings>
      <!-- Enable FillDB Page
           This setting enables or disables the /sitecore/admin/filldb.aspx page. Always disable this page in production environments.
           You can use the FillDB page to insert large amounts of test content into Sitecore to test facets, new search types, as well as
           the performance and scalability of indexing and search in your solution.
           Default value: false
      -->
      <setting name="EnableFillDB" value="true" />
    </settings>
  </sitecore>
</configuration>

Reloading the /Sitecore/admin/FillDB.aspx and the tool is ready to use.

The FillDB.aspx is divided into the two sections “Key Settings” and “Steps”, respectively.

The "Key Settings" section


The “Database Name” field specify the “context” database, from where the items will be created. If you want to create items into different databases, run the tool for each database specified in this field. 

The “Words Directory” field specify the location, where the FillDB.aspx tool will place the word files, which will be used to fill content into the created items. This will be explained below.

The "Steps" section

This section consist of six steps. The first three steps (“Prepare database”, “Prepare words directory” and “Download word files”) prepare the solution for filling the database with items. These steps only need to run once. The last three steps (“Clear site caches”, “Generate Items” and “Rebuild index”) should be run, whenever using the tool for creating items.

The first step:


This step runs the ItemGenerator.sql. The ItemGenerator.sql creates to stored procedures into the specified database (in the “Key Settings” section) “AppendVersionedFields” and “AppendItems”, respectively. The stored procedures prepares the tool to insert items into the tables “VersionedFields” and “Items” respectively. 

The second step:


This step creates the directory specified in the “Word directory” field from the “Key Settings”. 

The third step:


In this step you specify from where to get the text files, used to fill values into the created items. The text files will be placed into the “Word directory”. 

The fourth step:


This step clear all defined sites caches.

The fifth step:
This step creates the items based on the six values specified in this step. Notice, the tool allows you to prefix the items created. 


The sixth (and last) step:

In this step, you can specify the indexes, which should be rebuild. By specifying item GUIDs in the “Index roots” field, the FillDB.aspx allows you to specify the root item(s) from where the index will be rebuild along with the root items descendants. 

As stated above, the first three steps need to run the first time. Afterwards, you only need to run the last three steps (step 4 to 6).

When the tool has finished running, some data about the run will provide at the top of the tool:


Navigation to the Content Editor, and verify the items created. Notice, the tool creates the items in a new folder created under the specified parent item specified in step five “Generate items”:


In Sitecore version 8 the FillDB.aspx is equal to the one reworked in Sitecore version 7.2. No changes had been made.


Extend a Sitecore Pipeline

Extending one of Sitecores pipelines with some custom code is straightforward. Just remember that to extend the pipeline at the right spot making sure that Sitecore has generated the data you need to use. If you extends the httpRequestBegind pipeline, you will not be able to get any data about the requested item before the Sitecore.Pipelines.HttpRequest.ItemResolver has finished etc.

Create your custom code and letting your class inheriting from Sitecore.Pipelines.HttpRequest.HttpRequestProcessor (In the case of extending the httpRequest pipeline):


The next step you need to do is to add your extension into the settings of the httpRequestBegin pipeline as a new processor. In this case, I want my extension to start after:


You could add your extension directly under the above processor in the web.config file. Though of course best practice is to add a new include file, making sure the new include file is rendered in the desired order:
 
<configuration xmlns:patch="http://www.sitecore.net/xmlconfig/">
  <sitecore>
    <pipelines>
      <httpRequestBegin>
        <processor patch:after="*[@type='Sitecore.Pipelines.HttpRequest.IgnoreList, Sitecore.Kernel']"
          type="MyExtensions.Pipelines.HttpRequest.Sleep, MyExtensions" />
      </httpRequestBegin>
    </pipelines>
  </sitecore>
</configuration>

... finally, load yourDomain/Sitecore/admin/showconfig.aspx to verify your extension is rendered the right place:

Sitecore Pipeline Profiler

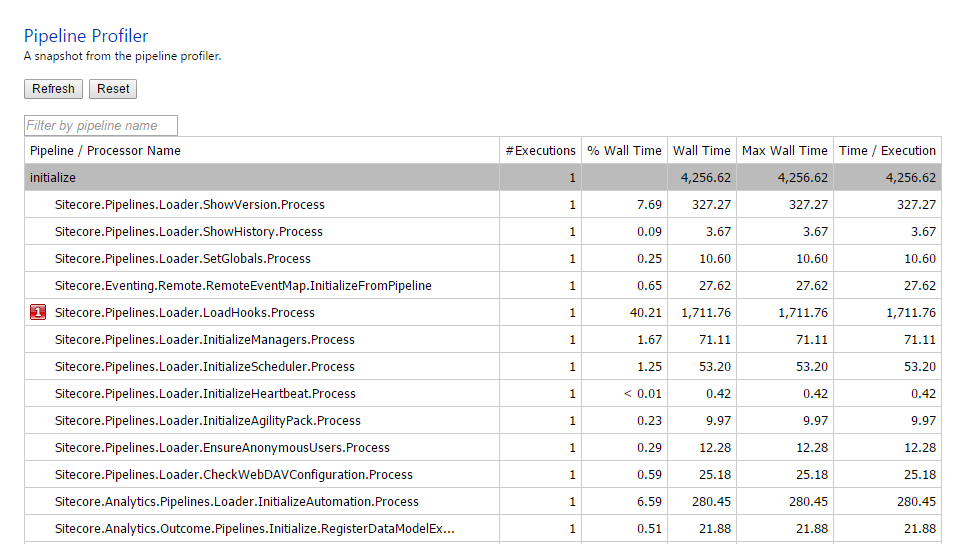
In Sitecore version 7, Sitecore introduced a new profiling tool, the Pipeline Profiler. From the Pipeline Profiler tool, you will be able to monitor performance and utilizations of all the Sitecore pipelines used by the Sitecore solution (the Sitecore client and the website). The Pipeline Profiler tool listing the profiling data for each of the pipeline processors. 

Getting this data, you will be able to pinpoint the processors spending most of the time and improve performance by optimizing those specific processors.

You access the Pipeline Profiler tool from yourDomain/sitecore/admin/pipelines.aspx (the same location as the stats.aspx, showconfig.aspx, dbbrowser.aspx etc). However, Sitecore disables the Pipeline Profiler tool by default:


To enable the tool, the only thing you need to do, is to enable the Sitecore.PipelineProfiling.config.disable (by removing the “.disable”) located at /App_Config/Include, and reload the Pipeline Profiler tool:


In Sitecore 8, the Sitecore.PipelineProfiling.config file contains only two settings, the “Pipelines.Profiling.Enable” and the “Pipelines.Profiling.MEasureCpuTime” respectively:

  
        <configuration xmlns:patch="http://www.sitecore.net/xmlconfig/" xmlns:set="http://www.sitecore.net/xmlconfig/set/">
            <sitecore>
                    <settings>
                    <!--  PIPELINE PROFILING ENABLED
                             Specifies whether or not pipeline profiling is enabled. When it is enabled, a profiling snapshot is available 
                             at /sitecore/admin/pipelines.aspx.
                             Default value: true
                    -->
                    <setting name="Pipelines.Profiling.Enabled" set:value="true" />

                    <!--  PIPELINE PROFILING MEASURE CPU TIME
                            Specifies whether or not the pipeline profiler measures CPU usage. Measuring CPU usage adds a performance overhead
                            to the pipeline but provides additional information about the behavior of the processors.
                            Default value: false
                    -->
                    <setting name="Pipelines.Profiling.MeasureCpuTime" set:value="false" />
                </settings>


Notice, the value of “Pipelines.Profiling.MeasureCpuTime” is false by default. Setting it to true, the Pipeline Profiling tool will measure the CPU usage as well:


If we add a new custom processor to the httpRequestPipeline etc. the new processor will be measured as well (In this case, the only thing the processor does, is sleep in 5 sec.)


Notice that Sitecore highlights the three processor of each pipeline taking most of the resource (indicated by the image number to the left of the processors).
The performance and utilization details declaration are at the bottom of the Pipeline Profiler tool:

Sitecore ECM - Remove App Center Warnings

Did you not purchased the Spam Detecter and/or the Email Preview service from the Sitecore App Center? ECM will constantly warn you with red massive ribbons as showed below. It is really a disturbing warning, when you work with the ECM (version 2.x).


If you want to remove the warnings, you simple have to delete the two following items (remember to back up the two items):

  • /sitecore/system/Modules/SPEAK/EmailCampaign/TaskPages/AdHockTaskPage/Review/EmailPreview
  • /sitecore/system/Modules/SPEAK/EmailCampaign/TaskPages/AdHockTaskPage/Review/SpamCheck

Here u go, After removing the two items, ECM no longer shows the warnings.

Disabling WebDAV

Do you use WebDAV when uploading media files to Sitecore? If not, why not disable WebDAV and reduce the number of log files and errors in the system log file? At least consider disabling it at your Content Delivery servers. It is easy and requires only five step and it is all done in the web.config file.

Step 1
Locate and remove (or out comment) the appender section named “WebDAVLogFileAppender” in within the setting (This section defines the location of the log files).
 
<appender name="LogFileAppender" type="log4net.Appender.SitecoreLogFileAppender, Sitecore.Logging">
      <file value="$(dataFolder)/logs/log.{date}.txt" />
      <appendToFile value="true" />
      <layout type="log4net.Layout.PatternLayout">
        <conversionPattern value="%4t %d{ABSOLUTE} %-5p %m%n" />
      </layout>
    </appender>
<!--    <appender name="WebDAVLogFileAppender" type="log4net.Appender.SitecoreLogFileAppender, Sitecore.Logging">
      <file value="$(dataFolder)/logs/WebDAV.log.{date}.txt" />
      <appendToFile value="true" />
      <layout type="log4net.Layout.PatternLayout">
        <conversionPattern value="%4t %d{ABSOLUTE} %-5p %m%n" />
      </layout>
    </appender> -->
    <appender name="SearchLogFileAppender" type="log4net.Appender.SitecoreLogFileAppender, Sitecore.Logging">
      <file value="$(dataFolder)/logs/Search.log.{date}.txt" />
      <appendToFile value="true" />
      <layout type="log4net.Layout.PatternLayout">
        <conversionPattern value="%4t %d{ABSOLUTE} %-5p %m%n" />
      </layout>
    </appender>

Step 2
Locate the system.webServer section and remove (or out comment) setting the remove setting named “WebDAVModule”.
 
<system.webServer>
    <modules runAllManagedModulesForAllRequests="true">
     <!-- <remove name="WebDAVModule" />-->
      <add type="Sitecore.Web.RewriteModule, Sitecore.Kernel" name="SitecoreRewriteModule" />
…
  </modules>

Step 3
At the handlers section of the system.webServer locate and remove (or comment out) the following three settings of WebDAV
 
    <handlers>
<!--      <add name="WebDAVRoot" path="*" verb="OPTIONS,PROPFIND" modules="IsapiModule" scriptProcessor="%windir%\Microsoft.NET\Framework\v4.0.30319\aspnet_isapi.dll" resourceType="Unspecified" preCondition="classicMode,runtimeVersionv4.0,bitness32" />
      <add name="WebDAVRoot64" path="*" verb="OPTIONS,PROPFIND" modules="IsapiModule" scriptProcessor="%windir%\Microsoft.NET\Framework64\v4.0.30319\aspnet_isapi.dll" resourceType="Unspecified" preCondition="classicMode,runtimeVersionv4.0,bitness64" />
      <add verb="*" path="sitecore_webDAV.ashx" type="Sitecore.Resources.Media.WebDAVMediaRequestHandler, Sitecore.Kernel" name="Sitecore.WebDAVMediaRequestHandler" /> -->
…
</handlers>

Step 4
Locate the httpHandlers section at system.Web and remove (or comment out) the WebDAV setting.
 
<httpHandlers>
      <add verb="*" path="sitecore_webDAV.ashx" type="Sitecore.Resources.Media.WebDAVMediaRequestHandler, Sitecore.Kernel" />
      <add verb="*" path="sitecore_media.ashx" type="Sitecore.Resources.Media.MediaRequestHandler, Sitecore.Kernel" />

Step 5
When you have comment out all the web.config settings of WebDAV listed above, you can now disable the Sitecore.WebDAV.config file from App_Config/Include folder.