Sitecore Extend Content Editor.js

I recently had a costumer, who wanted the Content Tree to be displayed by default in the Content Editor when editing an item through the Content Editor opened via Page Editor.

The following screen dumps will explain it…


Is it clear now?! :-)

Sitecore uses the “Content Editor.js” located at “/Sitecore/shell/Applications/Content Manager” when managing the behavior of the content editor. More specifically, it is the function “scContentEditor.prototype.initializeTree”, we should enhance. 

The functionality of the javascript varies slightly from version 6 and 7-8 in how to display the Content Tree Panel. 

Sitecore v7 – v8.1:

scContentEditor.prototype.initializeTree = function () {
    var ctl = scForm.browser.getControl("ContentTreePanel");

    if (ctl != null) {
        var visible = (scForm.getCookie("scContentEditorFolders") != "0") && (window.location.href.indexOf("mo=preview") < 0) && (window.location.href.indexOf("mo=mini") < 0) && (window.location.href.indexOf("mo=popup") < 0) || (window.location.href.indexOf("mo=template") >= 0);

        ctl.style.display = visible ? "" : "none";
    }
}


A slidely different in Sitecore v6:

scContentEditor.prototype.initializeTree = function () {
    var ctl = scForm.browser.getControl("ContentTreePanel");

    if (ctl != null) {
        var visible = (scForm.getCookie("scContentEditorFolders") != "0") && (window.location.href.indexOf("mo=preview") < 0) && (window.location.href.indexOf("mo=mini") < 0) && (window.location.href.indexOf("mo=popup") < 0) || (window.location.href.indexOf("mo=template") >= 0);

        ctl.style.display = visible ? "" : "none";

        var width = scForm.getCookie("scContentEditorFoldersWidth");

        if (width != null && width != "") {
            ctl.style.width = width;
        }
    }
}

What we want to do, is to make sure that the “var visible” is true, if the the Content Editor is opened through the Page Editor. When the Content Editor opens through the Page Editor, Sitecore adds the query string “sc_ce=1” to the URL. 

So, let us extend the function above with this  “|| (window.location.href.indexOf("sc_ce=1")”. Ending up with a javascript as following:

scContentEditor.prototype.initializeTree = function () {
    var ctl = scForm.browser.getControl("ContentTreePanel");

    if (ctl != null) {
        var visible = (scForm.getCookie("scContentEditorFolders") != "0") && (window.location.href.indexOf("mo=preview") < 0) && (window.location.href.indexOf("mo=mini") < 0) && (window.location.href.indexOf("mo=popup") < 0) || (window.location.href.indexOf("mo=template") >= 0) || (window.location.href.indexOf("sc_ce=1"));

        ctl.style.display = visible ? "" : "none";
    }
}

Sure, best practice is not to add the statement into the javascript, which Sitecore use. Instead, we should add the extended function into a separate javascript and enhance the Content Editor with the separated javascript. How do we add the javascript to the Content Editor?

Sitecore allow us to hook into the renderContentEditor pipeline to add controls into the head section of the standard Content Editor. This is exactly what we want to do. 

using System;
using System.Web.UI;
using Sitecore.Diagnostics;
using Sitecore.Pipelines;
 
namespace MySitecoreExtensions.Pipelines.ContentEditor
{
    public class AddScripts
    {
        public void Process(PipelineArgs args)
        {
            Sitecore.Context.Page.Page.Header.Controls.Add((Control)new LiteralControl(scriptTag.FormatWith("/MySitecoreExtensions/Content Editor/Javascripts/ShowTreeView.js"))));
        }
    }
}


Finally, we add the a new processor into the renderContentEditor pipeline :

<configuration xmlns:patch="http://www.sitecore.net/xmlconfig/">
    <sitecore>
        <pipelines>

<!-- render script to display content tree in page editor - Render content mode -->
            <renderContentEditor>
              <processor type="MySitecoreExtensions.Pipelines.ContentEditor.AddScripts, MySitecoreExtensions" patch:before="processor[@type='Sitecore.Shell.Applications.ContentEditor.Pipelines.RenderContentEditor.RenderSkinedContentEditor, Sitecore.Client']" />
            </renderContentEditor>
        </pipelines>
    </sitecore>
</configuration>

Sitecore Preview.ResolveSite

In Sitecore version 8.1 Sitecore has added the Preview.ResolveSite as a standard config setting. Previously, it was a hotfix ever since the initial release from Sitecore v. 6.6.0 up to Sitecore v. 8.0  https://kb.sitecore.net/articles/382913.

It is now a part of the standard settings, though it is set not to resolve site by default…

<!--  PREVIEW - RESOLVE SITE
  If false, the Preview.DefaultSite setting specifies the context site to use when a user previews an item.
  If true, when a user previews an item, Sitecore tries to resolve the root item and the context site based on the current content language
            and the path to the item. If Sitecore cannot resolve the context site, it uses the site that is specified in the Preview.DefaultSite setting.
            Default value: false (use the value of the Preview.DefaultSite setting)
      -->
    <setting name="Preview.ResolveSite" value="false"></setting>

Get external links from Rich Text Editor

Sometimes you want to manipulate links generated by the content authors added in the Rich Text Editor. It could be by adding query strings, set the target attribute to _blank if the link is an external link etc.

Sitecore resolves the internal links in the Rich Text Editor by using the ExpandLinks processor in the renderField pipeline (located in the web.config file) converting the GUID into valid URLs, but letting the external links unhandled. So if you want to manipulate external links, you could do it by adding a new processor into the renderField pipeline.

In this example, I want to add target=”_blank” if the link is an external link.

The code:

using System.Text.RegularExpressions;
using Sitecore.Data.Fields;
using Sitecore.Pipelines.RenderField;
 
namespace MySitecoreExtensions.Pipelines.RenderField
{
    public class AddTargetAttributes
    {
        public void Process(RenderFieldArgs args)
        {
            if (args.FieldTypeKey == "rich text")
            {
                args.Result.FirstPart = SetTargetAttribute(args);
            }
        }
 
        private string SetTargetAttribute(RenderFieldArgs args)
        {
            string fieldValue = args.FieldValue;
            string regexURL = @"(<a.*?>.*?</a>)";
 
            Regex regex = new Regex(regexURL, RegexOptions.IgnorePatternWhitespace | RegexOptions.IgnoreCase);
            MatchCollection matches = regex.Matches(fieldValue);
 
            foreach (Match match in matches)
            {
                if (!match.Success)
                    continue;

                string regexHref = @"href=\""(.*?)\""";
                Match maHref = Regex.Match(match.Value, regexHref, RegexOptions.Singleline);
                if (!maHref.Success)
                    continue;
 
                if (maHref.Value.ToLower().Contains("http://"))
                {
                    string enrichedURL = match.Value.Insert(2, " target=\"_blank\" ");
                    fieldValue = fieldValue.Replace(match.Value, enrichedURL);
                }
            }
 
            return fieldValue;
        }
    }
}


Finally I add a new processor to the renderField pipeline (into an include file):

<configuration xmlns:patch="http://www.sitecore.net/xmlconfig/">
    <sitecore>
            <renderField>
                <processor type="MySitecoreExtensions.Pipelines.RenderField.AddTargetAttributes, MySitecoreExtensions" patch:after="processor[@type='Sitecore.Pipelines.RenderField.GetInternalLinkFieldValue, Sitecore.Kernel']"/>
            </renderField>
    </sitecore>
</configuration>


Sitecore Language Fallback

Finally, Sitecore v. 8.1 support Language fallback out of the box.

The language fallback supports both at Item level and at field level and supports a chained fallback mode, where languages can fall back multiple times based on the associated langauges versions.

How does it work
The language fallback allows a developer to specify a default fallback language (for each of the language setting item in Sitecore) to use, when a visitor at the website request content that have not been created for the requested language version.

Template level
The “Tempalte Item” contains two new checkboks fields for handling the fallback language at item-level. The first checkbox “Enable Item Fallback” managing whether to use the fallback language, if the current item has no language version created for the requested language. The second checkbox “Enforce Version Presence” controls whether Sitecore should treat the specific item as non-existent, if the specific item has no versions created at the requested language.


Template Field level
The “Template Field Item” contains two new checkbox fields for handling the fallback language at field level, both placed at the “Data” field section. The first checkbox field “Enable Versioned Language Fallback” enables field-level fallback for only the current language version of the specific field. The second checkbox field “Enable Shared Language Fallback” enables the field-level fallback for the specific field in all languages. 


Specify the fallback language
To specify a fallback language for a specific language, Sitecore has added a field at the Language Setting Item in Sitecore (placed at: Sitecore/system/Languages/) called “Fallback Langauge”. If none is selected, the language has no fallback language. 

Enabling the fallback language features
Sitecore has added a new config file handling the language fallback settings. It is located at /App_Config/Sitecore.LangauageFallback.config. By default, the fallback language feature is disabled. To enable the fallback language, open the config file, find the two new site attributes, “enableItemLanguageFallback” and “EnableFieldLanguageFallback” respectively and set the attribute value to “true” (notice, the fallback feature is site specific):

<!-- ENABLE ITEM AND LANGUAGE FALLBACK PER SITE
         Using attribute patching below you can pick which fallback mode to enable (item-level or field-level or both) for each site 
         Consult official documentation on how to enable fallback feature in complex multi-site environments.
    -->
    <sites>
      <site name="shell">
        <patch:attribute name="enableItemLanguageFallback">false</patch:attribute>
        <patch:attribute name="enableFieldLanguageFallback">false</patch:attribute>
      </site>
      <site name="website">
        <patch:attribute name="enableItemLanguageFallback">true</patch:attribute>
        <patch:attribute name="enableFieldLanguageFallback">true</patch:attribute>
      </site>
    </sites>

Custom Tiles and Analytics Reports in Launchpad

Sitecore introduced the Launchpad in Sitecore 7.1, but was first a fullblown interface in Sitecore 8. Really, it has not been interesting until now that the Launchpad is the new default (and only) startup screen for all users.

So let’s take a look at how to customize the Launchpad.

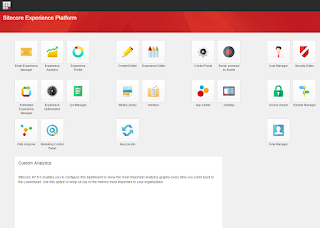
In this post, I will demonstrate how to add an analytic report chart into the Launchpad and how to hide the Fallback Message for Custom Analytics showing below.


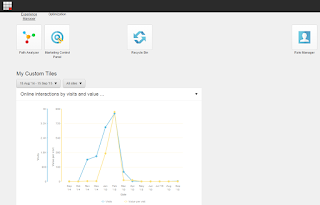
In the example, I want to reuse one of the analytics reports displayed in the Experience Analytics. I will use the “Online interactions by visits and value per visit” analytic chart. 


The “Online interactions by visits and value per visit”-chart, used by the analytics reports, is located in the core database at “/sitecore/client/Applications/ExperienceAnalytics/Dashboard/PageSettings/” (If you want to extend the Experience Analytics application containing new reports etc. this is the place for adding the charts. More about that at another time). The chart contains to metrics, “Visits” and “Value per visit” respectively, and the dimension “All visits By Channel Type”. 


So far so good. 

Next step is to assign renderings to the layout of the Launchpad for displaying the analytic chart.

The Launchpad is built using SPEAK. SPEAK is only accessible through Sitecore Rocks. Therefore, before I will be able to create or customize any new Tiles or analytic reports in Sitecore Launchpad, I have to install Sitecore Rocks in Visual Studio

From Rocks navigate to “/Sitecore/client/Applications/Launchpad” in the core database. It is at the layout of the Launchpad you should add the new renderings for displaying the analytic chart. Select “Task” and “Design Layout”.


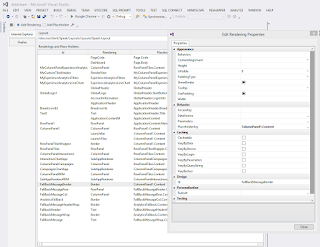
The layout of the Launchpad has associated many renderings by default, nested into each other. 


Eg. The LaunchBar-rendering, renders all the “applications buttons”-items placed under “/sitecore/client/Applications/Launchpad/PageSettings/Buttons” in the core database. The LaunchTiles-rendering, renders the “Tiles”-items placed under “/sitecore/client/Applications/Launchpad/PageSettings/Tiles” in the core database. Both renderings (LaunchBar and LaunchTiles) rendered the output into the placeholder “ColumnPanel1.Content” placed in the rendering with Id “ColumnPanel1”. These are not the tiles, we want to use in these example, though.

Taking a closer look, we see the Border-rendering with Id “RowPanelTilesWrapper” also rendered into the “ColumnPanel1.Content” placeholder. The RowPanel-rendering with Id “RowPanelTiles”, is rendered into the placeholder “RowPanelTilesWrapper.Content”. The RowPanelTiles is exactly the rendering we want to use, when rendering the Analytics Report chart.

As the name indicates, The RowPanel-rendering add a row-panel in the Tiles area of the Launchpad. Adding the analytic chart into the area of the Tiles, we first want to add a new column to place the chart. Therefore, select the “Add Rendering” command, choose the ColumnPanel rendering, and assign the rendering to the layout of the Launchpad. 


After assigning the ColumnPanel-rendering to the layout of the Launchpad, double click the rendering from the layout (the Renderings and Placeholder area) to open the “Edit Rendering Dialog”. Select the PlaceholderKey “RowPanelTitles.Content”. Set the GridColumns to 6 (This is where, you can manage the width of the column. Choose gridcolumn between 1-12). Finally specify the Id of the rendering (in this case it is “MyColumnPanelExperienceAnalytics”.


Next step is to assign the chart-rendering, we want to use, for displaying the chart. Select the “Add Rendering” command and select the ExperienceAnalyticsLineChart-rendering. 


Open the Edit Rendering Properties. Set “isVisble” attribute to “True”. Set the DataSource to “/sitecore/client/Applications/ExperienceAnalytics/Dashboard/PageSettings/Channels by visits” (The Analytic Report Chart I want to show in the Launchpad). Select the “MyColumnPanelExperienceAnalytics.Content” placeholder (specified by the MyColumnPanelExperienceAnalytics rendering we just added above). Set the Id to be “MyExperienceAnalyticsLineChart”. In the TimeResolution field you choose the default time resolution of the chart (Daily, Weekly or Monthly).


Save the layout. Log into your Sitecore Launchpad and you will find your newly added chart just below the application buttons. 


You may extend the Tiles area with a filter from where, you can filter the data in the chart. This is done by adding an ExperienceAnalyticsFilter and add a Header to the Tiles:


The last step is to hide the Fallback message in the Tiles area. Knowing how to add new renderings to the layout of the Launchpad, it is a simple task to hide the Fallback message. Find the “Border” rendering with Id “FallbackMessageBorder”, and open the Edit Rendering Properties dialog. Select the “IsVisble” attribute and set it to False. Save the Launchpad layout and redirect to the Launchpad in Sitecore. 


Now the “Custom Analytics” “FallbackMessage” dashboard is hidden. 


Damn ... that was a lot of screenshots ...

Content Editor Applications - Revisit

After publishing the post about Content Editor Applications, I saw a question in a Sitecore forum about setting up different security rights for a specific user, depending whether the user navigating the items located in the master DB or in the web database. This is obviously not possible by default, because of the way Sitecore security works.

However, with a simple extension to Sitecore, we could overcome this challenge.

The idea is to create a new role and set the security settings of the role to allow read access and deny all other permissions of all the content items. If the current requests context site is “shell” and the content database is web (meaning that the current user is logged into Sitecore and requesting the web database items), then the current user should have assigned the role.

By adding a new processer into the HttpRequst pipeline it is simple to do these checks.

First, what we want to do is to create the new role and assign the read permission to “allow”, all other permissions to “denied” and allow inheritance of the permissions at the top level of the content item in Sitecore. In this case, I have created a role named “WebDBReader”.


Next step is to create the code checking for the current request:


using Sitecore.Pipelines.HttpRequest;

namespace MySitecoreExtensions.Pipelines.HttpRequestBegin
{
    public class AssignWebReaderRole : HttpRequestProcessor
    {

        public override void Process(HttpRequestArgs args)
        {
            // If there is no context, we are not in a request from a web browser.
            if (args == null || args.Context == null)
            {
                // So we return.
                return;
            }

            //If the site not shell, the user is not logged into Sitecore
            if (!Sitecore.Context.GetSiteName().ToLower().Equals("shell"))
            {
                return;
            }

            if (args.LocalPath.ToLower().Equals("/keepalive.aspx"))
            {
                return;
            }

            if (!string.IsNullOrEmpty(args.Context.Request.QueryString["sc_content"]) &&
                args.Context.Request.QueryString["sc_content"].ToLower().Equals("web"))
            {
                if (!Sitecore.Context.User.IsInRole("sitecore\\WebDBReader"))
                {
                    Sitecore.Context.User.Roles.Add(Sitecore.Security.Accounts.Role.FromName("sitecore\\WebDBReader"));
                }
                return;
            }
            else
            {
                if (Sitecore.Context.User.IsInRole("sitecore\\WebDBReader"))
                {
                    Sitecore.Context.User.Roles.Remove(Sitecore.Security.Accounts.Role.FromName("sitecore\\WebDBReader"));
                }
                return;
            }
        }
    }
}


Finally, we add the extension in the HttpRequest pipeline. It is important to add the processor after the DatabaseResolver has finished:

 <httpRequestBegin>
...
        <processor type="Sitecore.Pipelines.HttpRequest.UserResolver, Sitecore.Kernel" />
        <processor type="Sitecore.Pipelines.HttpRequest.DatabaseResolver, Sitecore.Kernel" />
        <processor type="MySitecoreExtensions.Pipelines.HttpRequestBegin.AssignWebReaderRole, MySitecoreExtensions" />
        <processor type="Sitecore.Pipelines.HttpRequest.BeginDiagnostics, Sitecore.Kernel" />
        ...
      </httpRequestBegin>


And, there you have it. Now the authors would be able to navigate through the items in the web database, without being able to change the content. And still have their default security settings when navigating through the items of the master database.


Media hash and resizing

Sitecore introduced a new security feature in Sitecore version 7.5 regarding handling image requests in Sitecore. The feature restricts media URLs containing dynamic image-scaling parameters so only server-generated request are processed. Meaning, if a media request is processed, Sitecore skips the image scaling, if any of the parameters in the image URL have been altered or appended to the URL client side. Sitecore has added a new processor to the pipeline (added to a new include file, placed: /App_Config/Include/ Sitecore.Media.RequestProtection.config):

<pipelines>
      <renderField>
        <processor patch:before="processor[@type='Sitecore.Pipelines.RenderField.RenderWebEditing, Sitecore.Kernel']" type="Sitecore.Pipelines.RenderField.ProtectedImageLinkRenderer, Sitecore.Kernel" />
      </renderField>
    </pipelines>


What Sitecore do is, Sitecore adds a hash value to the image URL query string, when images requests contains scaling parameters. This means, in older versions than Sitecore versions 7.5 a media request may look something like this:

http://[yourDomain]/~/media/Default Website/sc_logo.ashx?w=100&h=75

scaling the original image from:


to:


(for image scaling parameters [link: http://www.sitecore.net/learn/blogs/technical-blogs/john-west-sitecore-blog/posts/2011/05/media-options-and-query-string-parameters-in-the-sitecore-aspnet-cms.aspx])

In Sitecore version 7.5 and newer versions, the media request may look something like this:
http://[yourDomain]/~/media/Default Website/sc_logo.ashx?w=100&h=75&hash=D02739F8C8E02B64D5D2AD008175975D28123C17

Therefore, if you are manually setting up the image URL containing scaling parameters, you need to generate the correct hash value and append it to the image URL, or else Sitecore will only return the original unaltered image. You can generate the hash value by your C# code or by Sitecores new mediaHash.aspx tool.

By your C# code:
If you need the full media URL containing scaling parameters and the hash value in your C# code, you can use the HashingUtils.ProtectAssertUrl(url):

Sitecore.Resources.Media.HashingUtils.ProtectAssetUrl(
                               Sitecore.Resources.Media.MediaManager.GetMediaUrl(
                                   myMediaItem,
                                   new MediaUrlOptions()
                                   {
                                       Language = Context.Language,
                                       Width = 100,
                                       Height = 75
                                   }))

If you only need the hash value for the provided image URL, you could use the GetAssertUrlHash(url).

By MediaHash.aspx tool
You find the new mediaHash.aspx tool here: http://[yourDomain]/sitecore/admin/mediaHash.aspx. Add the media URL containing the scaling parameters into the textfield:


You can disable the security feature by setting the Media.RequestProtection.Enabled to false, but it is strongly recommended not to disable this feature.

<settings>
<!-- MEDIA - REQUEST PROTECTION - ENABLED
Specifies whether media request protection is enabled or not.
Default value: true-->
      <setting name="Media.RequestProtection.Enabled" value="false">
</setting>
...
</settings>


Additional Publishing Module

So, I finally got the time to publish my new module at Sitecore Marketplace. However, it is more like a couple of new Sitecore Client features than a real module. Actually, it’s only two new (but looong missing) features.

The module is called "Additional Publishing" and adds a new chunk into the “Publishing” tab, named “Additional Publishing”. The chunk contains the two new features/commands “Publish My Items” and “Publish Deleted Items”, respectively.


Publish My Items

The “Publish My Items” command allows a user (who has access right to the Publishing Tab) to publish all the items, the user has created and/or modified since the last time, the items was published. If the current user is an administrator, the administrator can choose another Sitecore user items to publish. 

The way the command work is, it takes all the publishing candidates from the Sitecore Publishing Queue and compare the value of the “__Updated by” field of the publishing candidate with the name of the current Sitecore user. If the “__Updated by” value is equal to the name of the current Sitecore user, the command will publish the item. 


Publish Deleted Items

The “Publish Deleted Items” command allows a user to “un-publish” or “remove” items from the publishing target databases, which have been deleted from the source/master database. This, without the need of publishing the parent item of a deleted item or without starting an incremental publishing of the website. 


The way the command works is, it (like the “Publish My Items” command) takes all the items located in the Publishing Queue and check whether the item exist in the source database (normally the master database). If the item does not exist in the source database (the item is deleted), the changes of the item (the deletion) will be published and the item will be removed the item from the publishing targets.

Content Editor Applications

In one of my last post, I wrote about how to change the source parameter of the Content Editor ending up with Content Editors displaying content from E.g. the Web database.

Another way to have a Content Editor handling different sources is to add additional Content Editor Applications to the existing Content Editor. A Content Editor Application is a link to an application rendered by the Content Editor. You navigate to the application by a link at the bottom of the Content Editor. By default, the Content Editor applications include the “Content Editor”, “Media Library” and the “Workbox”:


Adding a new Content Editor Application 

Adding a new Content Editor Application only takes a single step. 

Go to the Core database and navigate to “/Sitecore/content/applications/content editor/applications/”. Under this item, you find the Content Editor Applications of the “Content Editor”, “Media Library” and the “Workbox” respectively.

Create a new Content Editor Application item based on the template located at “/Sitecore/templates/Sitecore client/content editor/content editor application” or duplicate one of the existing Applications. In this case, I duplicated the “ContentEditorFrom” and renamed it to “Web DB” (I want a Content Editor displaying the items published to the Web database).


The Content Editor Application Item have two fields. The “Header” field providing the link text of the Content Editor Application, and the “Source” field referrer to the url of the webform to be rendered. Add “&sc_content=web” as a query string to the url, and the Content Editor uses the Web database. Changing it to “&sc_conten=core” and the Content Editor uses the Core database instead:


Save the added Content Editor Application item and reload the Content Editor from the Master database and your new created Content Editor Application will be displayed at the bottom of the Content Editor: 


Taking it a step further

From the Source field of the Content Editor Application, you can specify the destination path from where the navigation in the Content Editor (or Media Library) should start. You could duplicate the MediaLibraryForm and add the url to a specific folder in the Media Library into the “&ro=” query string etc.:


The new Content Editor Application will open up the Media Library with the “/Sitecore/media liabrary/images” as root item:


You can actually set the “&ro=” to any path in the database specified by the “&sc_content=” query string. In this way, you can specify the “&ro=” to point where Eg. The Sitecore module “Web Forms For Marketers” places the forms or where any module creates module specific items.

Because a new Content Editor Application is added as a new items into the Core database, you could use the Sitecore security settings to handle, who is able to see and use the Content Editor Applications.


EDIT: Or you could check this out - Content Editor Applications revisit

FillDB.aspx

In version 7 Sitecore introduced the FillDB.aspx, which allows you to create a huge amount of content items (for performance testing) based on several parameters specified in the FillDB.aspx.

In Sitecore version 7.2 the FillDB.aspx has been reworked. Besides that FillDB.aspx now uses a web.config setting to enabled the tool (which gives you the advantages of managing the tool differently from different environments), each step in the tool is now optional and lets the user specify the parameters for the steps. Also, from version 7.2 the FillDB.aspx handles POST request.

Following is a walkthrough of the FillDB.aspx from Sitecore version 7.2. You find the tool by navigate to /sitecore/admin/FillDB.aspx. By default, the tool is disabled due to the config setting "EnableFillDB":


The config setting for enabling the tool is located in the Sitecore.Bucket.config (located at “App_Config/Include”). You can change the value of the setting named “EnableFillDB” from “false” to “true” directly into this include file, or you can add the setting into a specific include file for the development environment (doing so, just make sure, your own include file will be rendered after the Sitecore.Bucket.config):

<configuration xmlns:patch="http://www.sitecore.net/xmlconfig/">
  <sitecore>
    <settings>
      <!-- Enable FillDB Page
           This setting enables or disables the /sitecore/admin/filldb.aspx page. Always disable this page in production environments.
           You can use the FillDB page to insert large amounts of test content into Sitecore to test facets, new search types, as well as
           the performance and scalability of indexing and search in your solution.
           Default value: false
      -->
      <setting name="EnableFillDB" value="true" />
    </settings>
  </sitecore>
</configuration>

Reloading the /Sitecore/admin/FillDB.aspx and the tool is ready to use.

The FillDB.aspx is divided into the two sections “Key Settings” and “Steps”, respectively.

The "Key Settings" section


The “Database Name” field specify the “context” database, from where the items will be created. If you want to create items into different databases, run the tool for each database specified in this field. 

The “Words Directory” field specify the location, where the FillDB.aspx tool will place the word files, which will be used to fill content into the created items. This will be explained below.

The "Steps" section

This section consist of six steps. The first three steps (“Prepare database”, “Prepare words directory” and “Download word files”) prepare the solution for filling the database with items. These steps only need to run once. The last three steps (“Clear site caches”, “Generate Items” and “Rebuild index”) should be run, whenever using the tool for creating items.

The first step:


This step runs the ItemGenerator.sql. The ItemGenerator.sql creates to stored procedures into the specified database (in the “Key Settings” section) “AppendVersionedFields” and “AppendItems”, respectively. The stored procedures prepares the tool to insert items into the tables “VersionedFields” and “Items” respectively. 

The second step:


This step creates the directory specified in the “Word directory” field from the “Key Settings”. 

The third step:


In this step you specify from where to get the text files, used to fill values into the created items. The text files will be placed into the “Word directory”. 

The fourth step:


This step clear all defined sites caches.

The fifth step:
This step creates the items based on the six values specified in this step. Notice, the tool allows you to prefix the items created. 


The sixth (and last) step:

In this step, you can specify the indexes, which should be rebuild. By specifying item GUIDs in the “Index roots” field, the FillDB.aspx allows you to specify the root item(s) from where the index will be rebuild along with the root items descendants. 

As stated above, the first three steps need to run the first time. Afterwards, you only need to run the last three steps (step 4 to 6).

When the tool has finished running, some data about the run will provide at the top of the tool:


Navigation to the Content Editor, and verify the items created. Notice, the tool creates the items in a new folder created under the specified parent item specified in step five “Generate items”:


In Sitecore version 8 the FillDB.aspx is equal to the one reworked in Sitecore version 7.2. No changes had been made.


Extend a Sitecore Pipeline

Extending one of Sitecores pipelines with some custom code is straightforward. Just remember that to extend the pipeline at the right spot making sure that Sitecore has generated the data you need to use. If you extends the httpRequestBegind pipeline, you will not be able to get any data about the requested item before the Sitecore.Pipelines.HttpRequest.ItemResolver has finished etc.

Create your custom code and letting your class inheriting from Sitecore.Pipelines.HttpRequest.HttpRequestProcessor (In the case of extending the httpRequest pipeline):


The next step you need to do is to add your extension into the settings of the httpRequestBegin pipeline as a new processor. In this case, I want my extension to start after:


You could add your extension directly under the above processor in the web.config file. Though of course best practice is to add a new include file, making sure the new include file is rendered in the desired order:
 
<configuration xmlns:patch="http://www.sitecore.net/xmlconfig/">
  <sitecore>
    <pipelines>
      <httpRequestBegin>
        <processor patch:after="*[@type='Sitecore.Pipelines.HttpRequest.IgnoreList, Sitecore.Kernel']"
          type="MyExtensions.Pipelines.HttpRequest.Sleep, MyExtensions" />
      </httpRequestBegin>
    </pipelines>
  </sitecore>
</configuration>

... finally, load yourDomain/Sitecore/admin/showconfig.aspx to verify your extension is rendered the right place:

Sitecore Pipeline Profiler

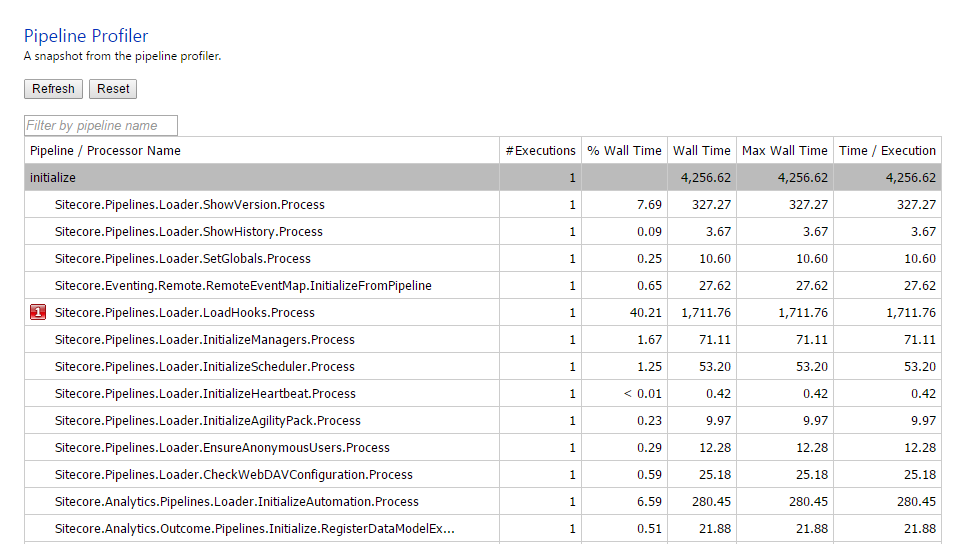
In Sitecore version 7, Sitecore introduced a new profiling tool, the Pipeline Profiler. From the Pipeline Profiler tool, you will be able to monitor performance and utilizations of all the Sitecore pipelines used by the Sitecore solution (the Sitecore client and the website). The Pipeline Profiler tool listing the profiling data for each of the pipeline processors. 

Getting this data, you will be able to pinpoint the processors spending most of the time and improve performance by optimizing those specific processors.

You access the Pipeline Profiler tool from yourDomain/sitecore/admin/pipelines.aspx (the same location as the stats.aspx, showconfig.aspx, dbbrowser.aspx etc). However, Sitecore disables the Pipeline Profiler tool by default:


To enable the tool, the only thing you need to do, is to enable the Sitecore.PipelineProfiling.config.disable (by removing the “.disable”) located at /App_Config/Include, and reload the Pipeline Profiler tool:


In Sitecore 8, the Sitecore.PipelineProfiling.config file contains only two settings, the “Pipelines.Profiling.Enable” and the “Pipelines.Profiling.MEasureCpuTime” respectively:

  
        <configuration xmlns:patch="http://www.sitecore.net/xmlconfig/" xmlns:set="http://www.sitecore.net/xmlconfig/set/">
            <sitecore>
                    <settings>
                    <!--  PIPELINE PROFILING ENABLED
                             Specifies whether or not pipeline profiling is enabled. When it is enabled, a profiling snapshot is available 
                             at /sitecore/admin/pipelines.aspx.
                             Default value: true
                    -->
                    <setting name="Pipelines.Profiling.Enabled" set:value="true" />

                    <!--  PIPELINE PROFILING MEASURE CPU TIME
                            Specifies whether or not the pipeline profiler measures CPU usage. Measuring CPU usage adds a performance overhead
                            to the pipeline but provides additional information about the behavior of the processors.
                            Default value: false
                    -->
                    <setting name="Pipelines.Profiling.MeasureCpuTime" set:value="false" />
                </settings>


Notice, the value of “Pipelines.Profiling.MeasureCpuTime” is false by default. Setting it to true, the Pipeline Profiling tool will measure the CPU usage as well:


If we add a new custom processor to the httpRequestPipeline etc. the new processor will be measured as well (In this case, the only thing the processor does, is sleep in 5 sec.)


Notice that Sitecore highlights the three processor of each pipeline taking most of the resource (indicated by the image number to the left of the processors).
The performance and utilization details declaration are at the bottom of the Pipeline Profiler tool:

Sitecore ECM - Remove App Center Warnings

Did you not purchased the Spam Detecter and/or the Email Preview service from the Sitecore App Center? ECM will constantly warn you with red massive ribbons as showed below. It is really a disturbing warning, when you work with the ECM (version 2.x).


If you want to remove the warnings, you simple have to delete the two following items (remember to back up the two items):

  • /sitecore/system/Modules/SPEAK/EmailCampaign/TaskPages/AdHockTaskPage/Review/EmailPreview
  • /sitecore/system/Modules/SPEAK/EmailCampaign/TaskPages/AdHockTaskPage/Review/SpamCheck

Here u go, After removing the two items, ECM no longer shows the warnings.